You set up for a squat, descend, and hit a hard stop well above parallel. You approach the bar for a deadlift and feel a tug in your hamstrings before you even begin the pull. For many lifters, the barrier to lifting heavier and safer isn’t a lack of strength—it’s a lack of mobility. Mobility, the active range of motion your joints can control under tension, is the unsung hero of lifting performance. Without adequate mobility in your ankles, hips, and thoracic spine, you’ll never achieve optimal positioning, forcing your body to compensate and limiting your potential.
Chasing more weight without the requisite mobility is like trying to rev a high-performance engine with the parking brake on. It leads to inefficient movement, premature plateau, and increased injury risk. This guide cuts through the noise to provide targeted, effective mobility drills that directly address the common limiting factors for the squat and deadlift. Let’s unlock the movement your lifts require.
Why Mobility is Non-Negotiable for Strength
Mobility is not just “stretching.” It’s the intersection of flexibility (passive range of motion) and motor control (the strength to use that range). For lifting, you need usable range of motion under load. Poor ankle mobility can cause your heels to lift in a squat, forcing your torso forward and straining your lower back. Tight hips can prevent you from reaching depth, limiting glute engagement and placing undue stress on the knees. A stiff thoracic spine (upper back) compromises your ability to maintain a tight, neutral spine in both the squat and deadlift, robbing you of power and safety.
Improving mobility in these key areas allows you to achieve stronger, more stable positions. A deeper squat with an upright torso recruits more muscle mass. A deadlift setup with a flat back and engaged lats creates a more efficient pulling channel. Ultimately, better mobility translates directly to better technique, which is the foundation of increased strength.
The 3 Key Joints: Ankles, Hips, and Thoracic Spine
A targeted approach is essential. You don’t need to mobilize everything; you need to focus on the joints that directly impact your barbell path and spinal alignment.
1. Ankle Mobility: Your Squat’s Foundation
The squat is essentially an ankle, knee, and hip flexion movement. Restricted ankle dorsiflexion (the ability to bring your shin toward your toes) is a primary culprit for lifters who fall forward or can’t hit depth. Improving it allows your knees to travel forward appropriately, keeping your torso more upright and your weight centered over your mid-foot.
2. Hip Mobility: The Hinge and Depth Controller
The hips are the powerhouse for both lifts. For the deadlift, you need adequate hip flexion (the ability to bend at the hip) to get into the start position without rounding your back. For the squat, you need a combination of flexion, internal rotation, and abduction to allow your knees to track out and your pelvis to tuck under as you descend. Tight hip flexors, adductors, or external rotators can severely limit your range.
3. Thoracic Spine Mobility: Maintaining Your Armor
Your thoracic spine (the 12 vertebrae in your upper and mid-back) must be able to extend and rotate to maintain a neutral, braced spine under the bar. A stiff, rounded upper back in a squat forces excessive extension in the lower back. In the deadlift, it makes setting your lats and creating tension nearly impossible. Mobilizing this area is about creating space and control, not instability.
The Pre-Lift Mobility Routine (5-7 Minutes)
Perform this circuit 2-3 times before your squat or deadlift session, holding each drill for 30-45 seconds per side where applicable.
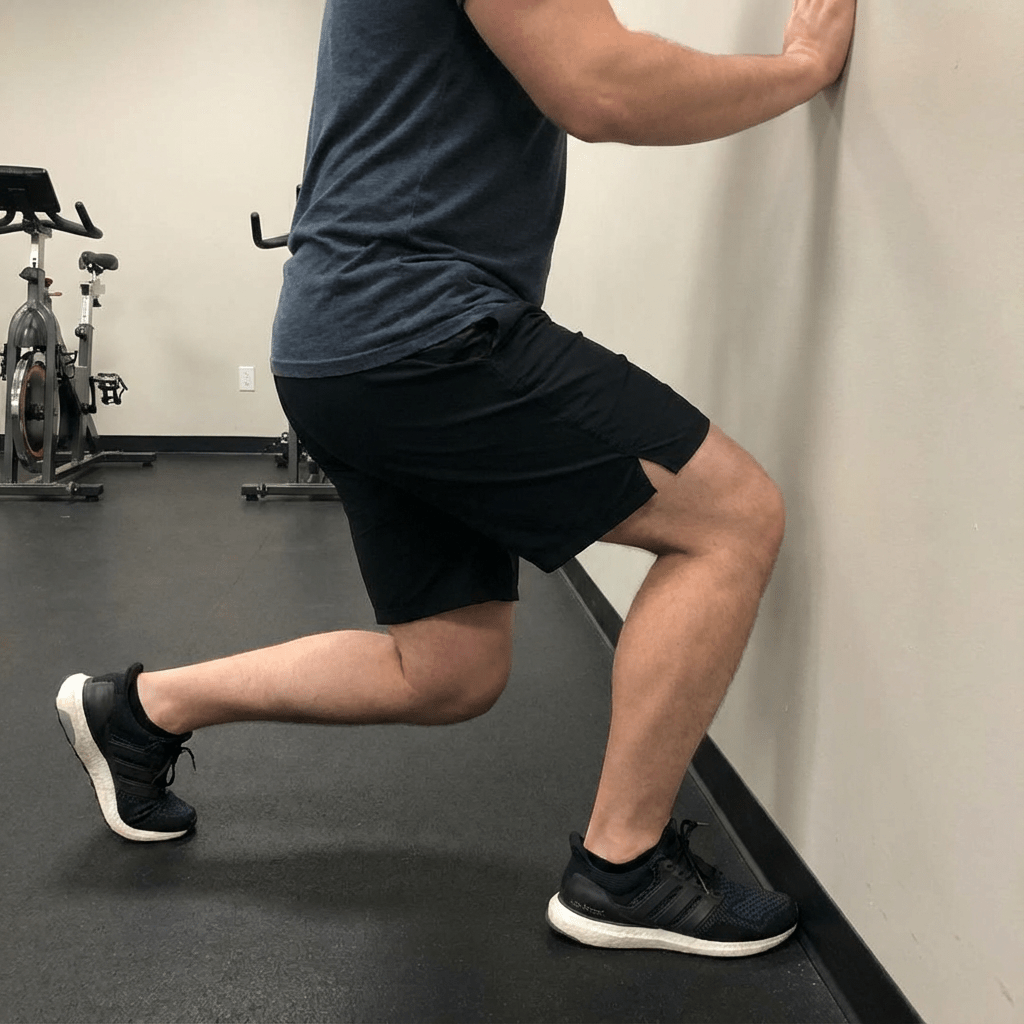
Drill 1: Knee-to-Wall Ankle Mobilization
This is the gold standard for assessing and improving ankle dorsiflexion. Stand facing a wall with your toes about a fist’s distance away. Keeping your heel flat on the ground, drive your knee forward to touch the wall. If you can do so without your heel lifting, step your foot back half an inch and repeat. If you cannot, that’s your current limit; hold the position at your end range, gently pressing your knee forward. Ensure your knee tracks in line with your second toe, not caving inward.
Drill 2: 90/90 Hip Switch
Sit on the floor. Position one leg in front of you with the knee bent at 90 degrees and the foot pointing to the side. Position the other leg to the side with the knee bent at 90 degrees and the foot pointing behind you. Your shins should form a 90-degree angle with each other. Maintain an upright posture. Gently switch the positions of your legs, rotating at the hips, moving back and forth in a controlled manner. This drill dynamically opens up internal and external hip rotation.
Drill 3. World’s Greatest Stretch (Lateral Emphasis)
From a standing position, take a large step forward into a deep lunge. Place both hands on the floor inside your front foot. Gently sink your hips forward and down. Then, take the elbow of the arm opposite your front foot and try to touch it to the inside of your front foot, feeling a stretch in the rear hip. Next, take that same hand and reach it up toward the ceiling, rotating your torso to open up the front of your shoulder and chest. This is a comprehensive drill for hip flexors, thoracic rotation, and shoulder mobility.
Drill 4. Cat-Cow with Thoracic Emphasis
Get on your hands and knees in a tabletop position. For the “Cow,” inhale as you drop your belly, lift your chest and tailbone, and look up. Focus on creating the arch sequentially from your tailbone up through your thoracic spine, not just jamming your lower back. For the “Cat,” exhale as you round your spine toward the ceiling, tucking your chin and pelvis. Move slowly with your breath, specifically trying to initiate the movement from your mid-back.
Integrating Mobility into Your Training Week
Mobility work yields the best results when done consistently, not just as a last-minute fix before heavy singles. Dedicate 10-15 minutes, 3-4 times per week, to these drills outside of your training sessions—think of it as skill work for your joints. On heavy lifting days, use the pre-lift routine above to prime your body. On rest days or after lighter sessions, focus on longer, more relaxed holds (60+ seconds) to improve tissue length. Remember, mobility is a slow burn. Track your progress by noting your comfort and depth in the bottom of a bodyweight squat or by measuring your knee-to-wall distance over weeks and months.
What If It’s a Strength Issue, Not Mobility?
Sometimes, the limitation is not a lack of range but a lack of strength within your existing range. If you can achieve a deep squat with no weight but collapse under the bar, you need to strengthen the end-range positions. Incorporate exercises like pause squats (3-second pause at the bottom) and deficit deadlifts (standing on a plate to increase the range of motion) with light to moderate weights. These build control and stability in the positions your mobility work is creating.
Chasing mobility isn’t about achieving contortionist feats; it’s about earning the right to lift with optimal, powerful, and safe mechanics. By dedicating a small portion of your training to mobilizing your ankles, hips, and thoracic spine, you remove the artificial ceilings on your squat and deadlift. You’ll set up with more confidence, move with greater fluidity, and recover more effectively.
Stop forcing your body into positions it can’t handle. Start giving it the tools it needs to excel. Your next personal record depends on it.


Leave a comment